Saturday 31 March 2012

Lego Head Cake


A friend contacted me to make a cake for her son's birthday and decided to get Lego as the theme. I have to admit I found quit a number of beautiful Lego cake in the net but nothing tickle my fancy as the Lego head idea. One of the brief is to make it not too cute because the birthday boy was turning nine and not to keen on the idea of cute cake. I hope he didn't find this too cute.

Unfortunately I didn't get a change to take some photos of this cake in the making. But as summary, I used polystyrene as the 'neck' and I placed 2 layers of 6 inch cake on to of 6 inch cake board. To get the rounded effect on the edge of the head I freeze the cake and carved is slightly. The round bit on top of the cake is fondant, I used blue fondant from my other project and cover it with yellow fondant. All the decorations are fondant. to secure the cake I used sharpened wooden dowel to pin the cake to the polystyrene neck.

 Lego Man

Details on the top bit

Birthday boy's name in Lego style font

View from the top

This was quite a fun cake to make and the only think that worried me is that the cake might fell off the polystyrene neck during transport. But I haven't heard anything from Travis' mum so I assume the cake traveling alright. Thank you all for checking, I will update you with my next project.

Pregnant Dress Cake


I've seen a lot of tutorial and pictures of princess or Barbie cakes and I found it quite intriguing. All I need is a little girl who's dream of a birthday cake is a princess or Barbie cake. Unfortunately the chance is not looking to come soon. Another thing that intrigue me is the bridal shower cake with the same concept but instead of barbie they used headless mannequin which can be done with fondant.

Long story short, I got my sister in law coming along, she might not be a girl with a dream of princess or Barbie birthday cake but I think the dress with mannequin might be more appropriate for her. So I took the chance and creating this dress cake with a twist because she's pregnant with her first child.

I had days of preparation with this cake and managed to do a step-by-step tutorial, I hope you enjoy it and find the tutorial helpful.

I started with a sketch of how it should look like. I saw a lot of dress cake with mannequin in the net but none of them depicting pregnant lady. So I did the sketch to give me a rough idea how it should look like as a guide when I carve the cake.

First thing I did is the mannequin as it will take long time to set, so I shaped black fondant mixed with tylose as the mannequine upper torso with pregnant belly and let it set for 2 days.

My sketch along with the mannequin torso, I used a handwash bottle to give the curve contour to the mannequin's back

Next time is the cake, I had Bakerz Mum baked me 1 x 6 inch cake and 2 x 4 inch cake, I sandwich them with butter cream, put it in the freezer and let it freeze over night.

The cake frozen and ready to carve

I placed the smaller cakes on the edge of the 6 inch cake to follow my sketch and give definition to the pregnant belly. I placed the mannequin torso on top of the cake with dowel as support and start carving.

Mannequin torso standing tall supported by dowel inserted to the cake

I started carving the cake following the shape of the mannequin

The cake carved and ready to be coated with buttercream

Once I'm happy with the shape of the cake I covered the cake with buttercream, actually butter cream is also good to help me shape the cake.

Start covering the cake with buttercream

I covered the cake all the way to the torso part, and put extra buttercream on the belly to give it more definition

The cake completely covered with butter cream

Side view so you can see the belly

Once the cake covered with butter cream, I covered the front part of the dress with white fondant. I was planning to use the petals technique for the front part of the dress. The first time I did the petals technique I didn't get a chance to do a tutorial so I'll do a tutorial for the dress.

Step 1: rolled fondant to desired thickness

Step 2: using round cutter cut the fondant

Step 3: cut approx. 1/3 of the circle

This is what it should look like

Step 4: using ball tool thin the edge

 Step 5: apply fondant glue to the dress

Step 6: placed the petals on the dress

The finish front of the dress withe petals

Once the petals part finished I covered the rest of the cake with pale yellow dress and add yellow sash

Pale yellow dress, it's a bit tricky putting the dress on I was successful on my fifth attemp.

Yellow sash and bow attached

It was really late by the time I finished this step so I leave it to Bakerz Mum to finish the cake with royal icing lace the next day.

View from the top, gorgeous lacing by Bakerz Mum I added the pearl necklace and royal icing trim on the dress.

Side view to show the pregnant belly

Back side with the bow

It was a nice surprise for my sister in law and she really appreciate our effort creating this cake for her birthday. I'm just hopping the this cake will be memorable for her because this is her first birthday away from home, first birthday as a wife and last birthday before being a mum.

The birthday girl with her cake

It was a really fun cake to make and love love love the challenge. I'm really satisfied by the result and would love to do a project like this soon. Thank you all for checking by, will update you with my next project.

Mulan Cupcakes

Mulan Cupcakes in a box of 24

An old friend contacted me asking for a quote for cupcakes for her daughter's birthday party. At first it's a bit indecisive about the theme of the cupcakes. But at the end we decided to go with Mulan to match the Mulan birthday cake done by the grandma.
This is my first cupcakes project, a bit time consuming because I can't do the decoration days in advance. But overall it's an enjoyable experience.

The girl Mulan

The boy Mulan

Captain Li

Mulan's Horse

Mushu

I was planning to make the cricket but it's too delicate and it was like 1 in the morning so I dropped it and asked Bakerz Mum to do the cherry blossom instead.
Credit to Bakerz Mum for getting the perfect cupcakes, in all she baked 60 cupcakes. The first batch of 24 was a write off, the second batch was not as high as I wanted it to be. The third and fourth batch were perfect.
Thanks for checking my blog, will update you with my next project.

Monday 19 March 2012

Koala Cake

Hi All,

A friend order this cake for her brother's visit to Melbourne. Initaly she wanted to order a cake for her Sister in Law's farewell party but they decided to go to Gold Coast as her farewell trip (what a send off). So she asked me to do a cake for her brother.

First idea came into my mind is  to make a tram cake, but it wasn't easy to find a tram template so I pitched the idea of Koala Cake instead and she agreed.

Koala Cake

I jumped to the internet to find inspiration and found a cute koala cake, but the icing was made of buttercream, so I decided to do fondant version. I drew the template following the size of the pan and transferred the design to tracing paper.

 The design

Design transferred as puzzle on tracing paper

Once all the component of the designed successfully transferred to tracing paper I started to cut the puzzles according to the guide. I rolled out the colored fondant and started cutting it based to the guide on tracing paper and start ensemble them together
The koala on progress

The finished Koala

Once the design finished, I let it rest for a few days to set. Bakerz Mum baked me 6' chocolate cake and I coat it with dark chocolate ganache and covered it with fondant. Once the cake is on top of cake board I laid down the design and decorated the bottom of the cake with royal icing.

Almost finished Koala Cake

Green royal icing was pipped around the bottom part of the cake and I added yellow sprinkler in true Aussie spirit.

Details on the bottom

Koala Cake from the side

It was a fun cake to make and I'm happy with the result. Hopping that in the future I get the opportunity to create a cake as fun as this one. Thanks for checking out my blog, over and out.


Tuesday 13 March 2012

Petal and Shoe Cake

Hi All,

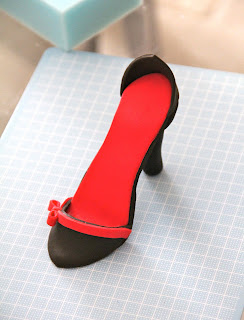
I made this cake for a friend's birthday, the birthday girl is very feminine and got a strong sense of fashion. Hence the color scheme and the shoe. The shoe meant to be a Louboutin shoe, but with lack of knowledge on the designer famous red under sole, I made a cardinal sin by placing the red on the inner sole..my bad.

Without further ado, I present you Petal cake with shoe on top....

The petal and shoe cake

I did the suppose to be Louboutin shoe days in advance. I started with the heels and let it set for a day and I continued with the sole and left it set for another day. This is my first fondant shoe, and I have to admit I need to learn more about shoe. I made this one too short, the length of the flat front bit is not enough and the toes area is too small. But I was quite happy with this first attempt.

My first fondant shoe, making it is not as easy as it looks on the tutorial

Bakerz mum  baked 2 beautiful 6 inch chocolate cakes and I covered it with dark chocolate ganache. The cake turned out quite tall just like I want it to be. Covering cake this tall with fondant is not an easy task but I think I've done quite a great job.

Cake covered in fondant with fondant shoe at the background

Once the cake covered and sit nicely on top of fondant covered cake board I started my petals journey. It was not hard to do but require patience which I didn't have then so I requested Bakerz mum to assist me gluing the petals on the cake.

First layer of petals placed

I started the first layer of petal with red color. I used round cutter and sliced it 3/4 of the length and thinning the edge with ball tool. Once the first layer is done, I mixed white fondant to add gradation to the color.

Onto the third layer

I gradually change the color from red to pale pink by adding white fondant to the red fondant.

Final layer placed

Initially I was planning to put black fondant ribbon on top of the final layer, but Bakerz mum suggested me to try satin ribbon. So I went to my utility cupboard and found red satin ribbon which worked perfect.

Petals on and ribbon to finish

The mandatory snap shot of the finished cake

The birthday girl was thrilled with the cake at least she said she was hehehehe. I had so much fun did this cake, I've seen this petal cakes on the internet so many time and never thought how such a simple process can have a huge impact on the cake. 

I hope you enjoyed my post, I posted this cake on Cake Central and for a brief moment this cake was number 1 on the Favorite Cakes of the day list.